
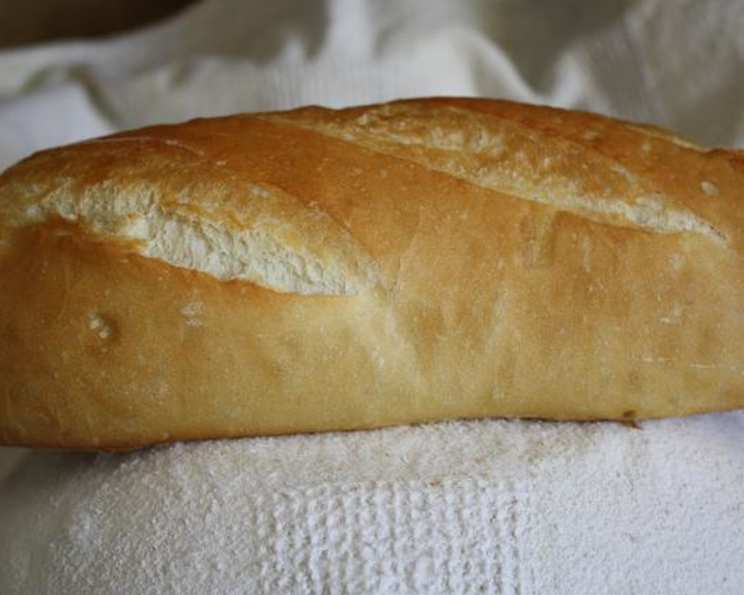
Mastering the Art of Authentic French Bread
The scent of freshly baked bread is a powerful time machine, instantly transporting me back to a tiny boulangerie in the Marais district of Paris. I remember stepping inside, the warmth of the oven a welcome embrace against the cool morning air. The baker, a man with flour dusting his apron like a badge of honor, handed me a still-warm baguette, its crust crackling beneath my fingertips. That simple loaf, with its complex flavor and airy interior, ignited a lifelong passion for baking, and a relentless pursuit to recreate that perfect French bread at home. This recipe is my tribute to that memory.
Recipe Overview
- Prep Time: 4 hours 30 minutes
- Cook Time: 28-30 minutes
- Total Time: Approximately 5 hours
- Yields: 2 loaves
- Dietary Type: Vegetarian, Vegan
Ingredients
- 4 cups flour, plus extra for kneading (Bread Flour or All-Purpose Flour work well)
- 1 tablespoon yeast
- 1 tablespoon salt
- 1 1/2 – 2 cups lukewarm water
- 1/2 cup water, for oven steaming
Equipment Needed
- Large mixing bowl
- Small mixing bowl
- Wooden spoon
- Measuring cups and spoons
- Clean work surface
- Plastic wrap
- Linen cloth or non-terry towel (slightly larger than a tea towel)
- Baking sheet or baking stone
- Pastry brush
- Sharp knife or lame
Instructions
-
In a small bowl, proof 1 tablespoon of yeast with 1/2 cup of lukewarm water. Set aside for about 5-10 minutes, until foamy. This step ensures your yeast is active and ready to leaven the dough.
-
In a large bowl, thoroughly mix 4 cups of flour and 1 tablespoon of salt. It’s important to evenly distribute the salt throughout the flour to prevent it from coming into direct contact with the yeast, which can inhibit its activity.
-
Pour the yeast mixture into the flour mixture. Using a wooden spoon, stir while gradually adding an additional 1 to 1 1/2 cups of lukewarm water until a dough forms and pulls away from the sides of the bowl. The amount of water may vary slightly depending on the humidity and the type of flour used. You’re aiming for a shaggy dough that’s not too sticky.
-
Lightly flour your work surface. Dump the dough out and knead for about 1-2 minutes, or until you get a recognizable ball. This initial kneading is just to bring the dough together; don’t worry about making it perfectly smooth at this stage. Let the dough rest while you clean your mixing bowl – about 5-6 minutes of rest time is ideal. This allows the gluten to start relaxing, making the next kneading process easier.
-
Once your bowl is clean and dry, it’s time for the main kneading process. Here, you have two options:
-
Method 1: Fast Kneading: Knead the dough in your usual way, giving it quarter turns, for 3-8 minutes, until it forms a nice elastic and smooth ball. Place the ball in your large bowl and cover it with plastic wrap. Let it rise for 90-120 minutes.
-
Method 2: Slow/Slap Bench Kneading (Traditional): This technique is a bit different. Flatten the dough out slightly, then roughly fold it into a single “book fold” (fold one-third of the dough over the center, then fold the remaining one-third over that). Hold the dough at one end (it will be oblong) and slap it down on the work surface. Refold and repeat this process approximately 850 times! This method develops the gluten in a unique way, resulting in a truly exceptional texture. Once this is accomplished, round the dough into a ball and place it in the bowl to rise for 90-120 minutes, covered with plastic wrap. While it sounds extreme, many bakers find this method less tiring than traditional kneading.
-
-
After the dough has fermented (risen), it’s time to form the loaves. Turn the dough out onto your kneading surface and flatten it with your hands (using a “smacking” action) to expel all the gasses. Divide the dough into two equal parts. Round each piece into a ball and let them rest for 5 minutes. This brief rest allows the gluten to relax again, making the shaping process easier.
-
Prepare a couche. A couche is traditionally made using a piece of linen cloth or a non-terry towel that’s slightly larger than a tea towel. Generously smooth flour into the fabric to fill any creases and crevices. Arrange the towel so it will cradle your loaves, creating a supportive environment for their final rise. This step, while optional, greatly improves the shape and rise of the loaves.
-
Taking one portion of dough, flatten it out with your hands to expel the gasses. Take the top edge and fold it down about two-thirds of the way over the dough. Using the heel of your hand, seal the dough onto itself. Repeat this fold and seal again. Fold the top edge down once more, this time folding all the way to the bottom and sealing the top to the bottom.
-
Lastly, taper off the ends of the dough by gently rolling your hands at the ends with a bit of pressure to form the classic French bread shape. You can continue rolling your hands down the length of the dough to make a baguette rather than tapering the ends.
-
Place your dough, seal side down, onto your couche, leaving a bit of space for the loaves to expand between them while still providing support.
-
Gash three diagonal cuts into the top of each loaf using a sharp knife or lame (a specialized bread-scoring tool). Cover the loaves with the rest of the towel and let them rise for another hour. This final proofing allows the loaves to achieve their maximum volume and develop a light and airy texture.
-
Gently peel the couche back from the loaves and carefully place them on either a baking sheet or a lightly floured paddle for transferring them to a baking stone. Avoid being rough, as you don’t want to deflate the loaves.
-
Brush the tops of the risen dough with cool water using a pastry brush. This helps to create a crisp, golden crust.
-
Cooking: Toss 1/2 cup of water into the bottom of the preheated oven at 425°F (220°C). Be extremely careful as the steam will be very hot! Immediately place the loaves in the oven and close the door. Reduce the oven temperature to 350°F (175°C) and bake for 28-30 minutes. The initial burst of steam helps to create a chewy interior and a crisp crust.
-
The bread is done when the bottoms sound hollow when tapped and the loaves have a rich, almost dark golden color.
-
For more in-depth information on the techniques used, search for videos of Julia Child or Danielle Forestier making French bread. They offer valuable insights into the traditional methods.
Expert Tips & Tricks
- Scoring the dough: Use a very sharp knife or a lame to score the loaves. A clean, decisive cut is essential for allowing the bread to expand properly in the oven and create those beautiful “ears.”
- Steam is key: The steam in the oven is crucial for achieving a proper crust. If you don’t have a baking stone, you can create steam by placing a cast-iron skillet on the bottom rack of the oven and pouring hot water into it when you put the loaves in.
- Listen to your dough: Pay attention to how the dough feels during kneading and proofing. It should be smooth, elastic, and slightly sticky. Adjust the amount of water as needed to achieve the right consistency.
Serving & Storage Suggestions
Serve your freshly baked French bread warm, with a generous slathering of butter, alongside a hearty soup, or as part of a cheese board. It’s also delicious simply enjoyed on its own.
To store, wrap the bread in a linen cloth or paper bag. It will stay fresh at room temperature for 1-2 days. For longer storage, freeze the bread whole or in slices. To reheat, thaw completely and then bake in a preheated oven at 350°F (175°C) for 5-10 minutes, or until warmed through.
Nutritional Information
Please note that these are estimates and can vary based on specific ingredients and portion sizes.
| Nutrient | Amount per Serving | % Daily Value |
|---|---|---|
| Calories | 930 kcal | N/A |
| Total Fat | 3g | 4% |
| Saturated Fat | 0.5g | 2% |
| Cholesterol | 0mg | 0% |
| Sodium | 3503mg | 145% |
| Total Carbohydrate | 193g | 64% |
| Dietary Fiber | 8g | 33% |
| Sugars | 1g | 2% |
| Protein | 28g | 56% |
Variations & Substitutions
- Whole Wheat French Bread: Substitute up to half of the all-purpose or bread flour with whole wheat flour for a nuttier flavor and increased fiber.
- Herb-Infused Bread: Add fresh or dried herbs, such as rosemary, thyme, or oregano, to the dough during the initial mixing stage.
- Sourdough French Bread: Incorporate a sourdough starter into the recipe for a tangier flavor and a chewier texture. You’ll need to adjust the rising times accordingly.
FAQs (Frequently Asked Questions)
Q: Why is the water added to the oven?
A: The water creates steam, which is crucial for achieving a crisp crust and a light, airy interior. The steam prevents the crust from setting too quickly, allowing the bread to expand fully.
Q: Can I use a stand mixer instead of kneading by hand?
A: Yes, you can use a stand mixer with a dough hook. Knead on low speed for about 8-10 minutes, or until the dough is smooth and elastic.
Q: What if my dough doesn’t rise properly?
A: Ensure your yeast is fresh and active. The temperature of the water is also important – it should be lukewarm, not too hot or too cold. Also, make sure the room temperature is warm enough for the dough to rise properly.
Q: Can I make this recipe into baguettes?
A: Absolutely! Simply shape the dough into longer, thinner loaves instead of the traditional oval shape. Adjust the baking time accordingly, as baguettes will bake faster.
Q: How do I know when the bread is done?
A: The best way to tell if the bread is done is to check the internal temperature with a thermometer. It should be around 200-210°F (93-99°C). You can also tap the bottom of the loaf – it should sound hollow.
Final Thoughts
This journey to perfect French bread is one filled with simple ingredients, time, and a bit of patience. Don’t be discouraged if your first attempt isn’t perfect; baking is a learning process. Each loaf will bring you closer to that elusive taste of a Parisian boulangerie. I encourage you to try this recipe, experiment with variations, and share your creations with friends and family. Serve alongside a bowl of French onion soup for a truly authentic experience!