
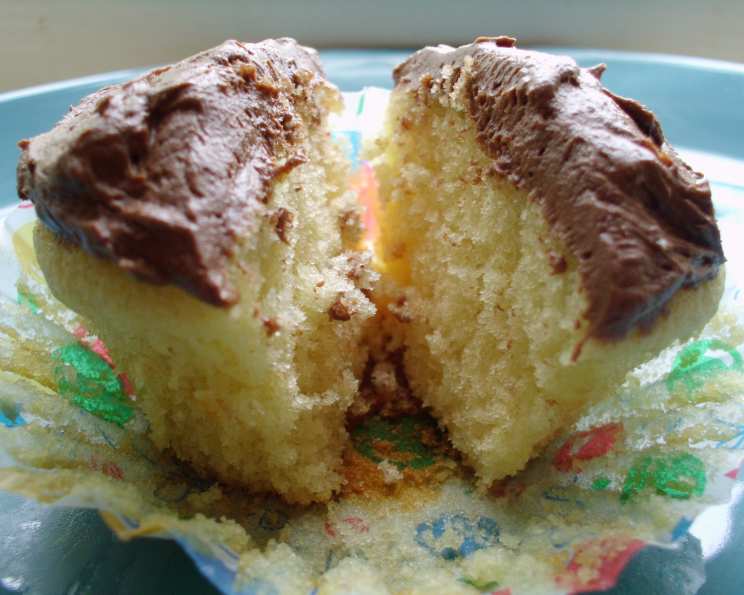
Sunshine on a Plate: Yellow Cupcakes with Decadent Chocolate Frosting
The memory is etched in my mind: a small, paper-lined cupcake pan, a swirling yellow batter, and the intoxicating aroma of baking vanilla filling the kitchen. My grandmother, a woman whose hands seemed to magically transform simple ingredients into culinary masterpieces, always let me lick the spoon. These weren’t just cupcakes; they were vessels of love, baked with care and topped with a rich, fudgy chocolate frosting that was the perfect counterpoint to the light, airy cake. Even now, decades later, the taste of these yellow cupcakes instantly transports me back to her warm kitchen, a place where every day felt like a celebration.
Recipe Overview
- Prep Time: 20 minutes
- Cook Time: 20-25 minutes
- Total Time: 45 minutes
- Yields: 18 cupcakes
- Dietary Type: Vegetarian
Ingredients
For the Classic Yellow Cupcakes:
- 2 cups all-purpose flour
- 1 ½ cups sugar
- 2 teaspoons baking powder
- 1 teaspoon baking soda
- 1 pinch salt
- 6 tablespoons unsalted butter, at room temperature
- 1 cup whole milk
- 2 eggs
- 1 teaspoon vanilla extract
For the Chocolate Buttercream Frosting:
- 2 ¼ cups confectioners’ sugar
- 8 tablespoons cocoa powder
- 6 tablespoons butter, room temperature
- 1 teaspoon vanilla
- 2 tablespoons milk
Equipment Needed
- Muffin tin
- Paper cupcake liners
- Electric mixer (stand or hand-held)
- Large mixing bowls
- Rubber spatula
- Wire cooling rack
- Sifter
Instructions
-
Prepare the Oven and Muffin Tin: Preheat your oven to 350°F (175°C). Line a muffin tin with paper cupcake liners. This prevents the cupcakes from sticking and makes for easy removal.
-
Combine Dry Ingredients: In a large mixing bowl, combine the all-purpose flour, sugar, baking powder, baking soda, and salt. Whisk together to ensure the ingredients are evenly distributed. This helps create a consistent texture in the cupcakes.
-
Cream Butter and Dry Ingredients: In the bowl of an electric mixer fitted with a paddle attachment (or using a hand-held electric whisk), add the dry ingredients and the softened butter. Beat on low speed until the mixture resembles a sandy consistency and everything is well combined. This process incorporates the butter into the flour, creating a tender crumb.
-
Incorporate Half the Milk: Gradually pour in half of the whole milk into the flour mixture and beat until the milk is just incorporated. Be careful not to overmix at this stage; you want to avoid developing too much gluten, which can result in tough cupcakes.
-
Prepare the Wet Ingredients: In a separate bowl, whisk together the eggs, vanilla extract, and the remaining whole milk for a few seconds. This creates an emulsion that will help bind the batter together.
-
Combine Wet and Dry Ingredients: Pour the wet ingredients into the flour mixture and continue beating until just incorporated. Use a rubber spatula to scrape down the sides of the bowl, ensuring all ingredients are fully combined.
-
Mix to Smoothness (But Don’t Overmix!): Continue mixing for a couple more minutes until the batter is smooth. It’s crucial not to overmix the batter at this point. Overmixing develops gluten, leading to dense, chewy cupcakes. A few lumps are okay, but avoid excessive stirring.
-
Fill the Cupcake Liners: Pour the batter into the prepared muffin tin, filling each paper liner about two-thirds full. This allows the cupcakes to rise without overflowing.
-
Bake the Cupcakes: Bake in the preheated oven for 20–25 minutes, or until the cupcakes are light golden brown and the sponge bounces back when touched. A toothpick inserted into the center should come out clean. Smaller cupcakes may need 3-5 minutes less baking time, so keep a close eye on them.
-
Cool the Cupcakes: Leave the cupcakes to cool slightly in the tray for a few minutes before transferring them to a wire cooling rack to cool completely. Frosting warm cupcakes can cause the frosting to melt.
-
Prepare the Chocolate Buttercream Frosting: While the cupcakes are cooling, prepare the frosting. In a large bowl, sift together the confectioners’ sugar and cocoa powder. Sifting ensures a smooth, lump-free frosting. Set aside.
-
Cream the Butter: In another large bowl, cream the softened butter until smooth and light. This incorporates air into the butter, creating a fluffy base for the frosting.
-
Incorporate Sugar Mixture: Gradually add in one-quarter of the sugar mixture, about 2 tablespoons at a time, to the creamed butter, mixing well after each addition.
-
Add Vanilla and More Sugar: Add in the vanilla, then another quarter of the sugar mixture, again about 2 tablespoons at a time, mixing well after each addition.
-
Adjust Consistency with Milk: The mixture should be firm at this point. Gradually add the milk, about ½ tablespoon at a time, alternating with 2 tablespoons at a time of the rest of the sugar mixture. Continue mixing until the frosting reaches a smooth, spreadable consistency. You may need slightly more or less milk depending on the humidity and the consistency of your butter.
-
Frost the Cupcakes: Once the cupcakes are completely cool, frost them generously with the chocolate buttercream frosting. You can use a piping bag for a more decorative touch or simply spread the frosting with a knife or spatula.
Expert Tips & Tricks
- Room Temperature Ingredients: Using room temperature butter and eggs is crucial for creating a smooth, emulsified batter. This helps the cupcakes bake evenly and results in a tender crumb.
- Don’t Overmix: Overmixing the batter develops gluten, leading to tough cupcakes. Mix until just combined.
- Even Baking: Ensure the cupcakes bake evenly by rotating the muffin tin halfway through the baking time.
- Frosting Consistency: Adjust the consistency of the frosting by adding more confectioners’ sugar for a thicker frosting or more milk for a thinner frosting.
- Chocolate Boost: For a richer chocolate flavor, add a teaspoon of instant espresso powder to the chocolate buttercream frosting.
- Cake Flour: For a lighter, more tender crumb, substitute 1/4 cup of the all-purpose flour with cake flour.
- Vegan Option: Substitute the butter with vegan butter, the milk with your favorite non-dairy milk, and use an egg replacement powder to make these cupcakes vegan.
Serving & Storage Suggestions
Serve these delightful yellow cupcakes with chocolate frosting as a sweet treat for any occasion. They are perfect for birthday parties, afternoon tea, or simply as a comforting dessert.
Storage:
- Room Temperature: Frosted cupcakes can be stored at room temperature in an airtight container for up to 2 days.
- Refrigerator: For longer storage, store the cupcakes in an airtight container in the refrigerator for up to 5 days. Allow them to come to room temperature before serving for the best flavor and texture.
- Freezer: Unfrosted cupcakes can be frozen for up to 2 months. Wrap them individually in plastic wrap and then place them in a freezer-safe bag or container. Thaw completely before frosting. Frosted cupcakes can also be frozen, but the frosting may become slightly altered in texture upon thawing.
Nutritional Information
| Nutrient | Amount per Serving | % Daily Value |
|---|---|---|
| Calories | 265.7 kcal | N/A |
| Calories from Fat | 82 g | 31% |
| Total Fat | 9.2 g | 14% |
| Saturated Fat | 5.5 g | 27% |
| Cholesterol | 42.6 mg | 14% |
| Sodium | 169 mg | 7% |
| Total Carbohydrate | 44.6 g | 14% |
| Dietary Fiber | 1.2 g | 4% |
| Sugars | 32.1 g | 128% |
| Protein | 3.2 g | 6% |
Note: Nutritional information is an estimate and may vary based on specific ingredients and preparation methods.
Variations & Substitutions
- Lemon Zest: Add 1 teaspoon of lemon zest to the cupcake batter for a bright, citrusy flavor.
- Almond Extract: Substitute the vanilla extract with almond extract for a slightly nutty flavor.
- Espresso Powder: Mix 1 teaspoon of instant espresso powder into the chocolate buttercream frosting to enhance the chocolate flavor.
- Different Frosting: Experiment with different frostings, such as vanilla buttercream, cream cheese frosting, or a simple glaze.
- Gluten-Free: Substitute the all-purpose flour with a gluten-free blend for a gluten-free version.
- Spice it Up: Add a pinch of cinnamon or nutmeg to the cupcake batter for a warm, comforting flavor, especially during the fall season.
FAQs (Frequently Asked Questions)
Q: Can I make the batter ahead of time?
A: While it’s best to bake the cupcakes immediately after preparing the batter, you can make the batter up to 24 hours in advance. Store it in the refrigerator and bring it to room temperature before baking.
Q: How do I prevent the cupcakes from sinking in the middle?
A: Ensure your oven is properly preheated and avoid opening the oven door frequently during baking. Overmixing the batter or using too much liquid can also cause sinking.
Q: Can I use a different type of milk?
A: Yes, you can substitute the whole milk with any type of milk you prefer, such as skim milk, almond milk, or soy milk. The flavor and texture might be slightly different.
Q: How do I make sure the cupcakes are moist?
A: Don’t overbake the cupcakes. Bake them until a toothpick inserted into the center comes out clean or with a few moist crumbs attached. Adding a tablespoon of sour cream or yogurt to the batter can also help retain moisture.
Q: What is the best way to frost the cupcakes?
A: For a smooth, even frosting, use a piping bag fitted with a decorative tip. Alternatively, you can spread the frosting with a knife or spatula. Make sure the cupcakes are completely cool before frosting.
Final Thoughts
These yellow cupcakes with chocolate frosting are more than just a recipe; they’re a reminder of simple pleasures, shared moments, and the joy of baking. I encourage you to try this recipe, create your own memories, and share the sweetness with those you love. Don’t be afraid to experiment with variations and substitutions to make it your own. And most importantly, savor every bite! Perhaps pair it with a glass of cold milk or a warm cup of coffee for the ultimate indulgence. Happy baking!