
Edible Elegance: Crafting Stunning Chocolate Bowls
The memory still makes me smile: a summer garden party, the air thick with the scent of roses and anticipation. I’d spent hours meticulously crafting tiny chocolate bowls, filled with a light-as-air lemon mousse and topped with fresh berries. The presentation was everything – delicate, unexpected, and utterly decadent. Watching guests’ faces light up as they realized they could eat the bowl was pure magic. That day, I learned that food isn’t just about taste; it’s about creating an experience, and chocolate bowls are the perfect vehicle for doing just that.
Recipe Overview
- Prep Time: 48 hours 30 minutes
- Cook Time: Varies based on chocolate tempering
- Total Time: 48 hours 30 minutes
- Servings: 24
- Yield: 24 single serving bowls
- Dietary Type: Gluten-Free
Ingredients
- 1 1/2 lbs dark chocolate chips (60% cacao or higher recommended; avoid “dipping chocolate”)
- 24 balloons
- Baking sheets lined with parchment paper
Equipment Needed
- Double boiler
- Chocolate thermometer (accurate below 100°F)
- Spoon
- Baking sheets
- Parchment paper
Instructions
-
Prepare the Balloons: Blow up the balloons to your desired bowl size. Tie a knot at the top of each balloon and set them aside. Consider the size of the finished bowl when inflating; smaller balloons are easier to manage.
-
Melt the Chocolate (First Stage): Place two-thirds of the dark chocolate chips into the top of a double boiler. Ensure the bottom pot has water, but do not let the water boil. The steam should gently heat the chocolate.
-
Monitor the Temperature: Stir the chocolate every few minutes. The goal is to raise the temperature above 105°F (approximately 40°C). Use your chocolate thermometer to track the temperature carefully. Be extremely cautious, as chocolate can burn at 200°F.
-
Melt the Chocolate (Second Stage): Once the majority of the chocolate has melted, remove the top of the double boiler from the heat.
-
Incorporate Remaining Chocolate: Stir in the remaining one-third of the chocolate chips. This step is crucial for tempering, as it helps to lower the temperature and create stable chocolate crystals.
-
Achieve Proper Temper: Continue stirring until all the remaining chocolate is completely melted. Place the top of the double boiler back over the bottom pot.
-
Maintain Temper: Regulate the heat under the double boiler to maintain a chocolate temperature between 88-90°F (approximately 31-32°C). This is the ideal temperature for tempering dark chocolate. Consistent stirring is important to ensure even temperature distribution.
-
Create Chocolate Discs: Spoon approximately 1/2 teaspoon (or less) of the tempered chocolate onto the parchment-lined baking sheets. These small discs will serve as the base for your chocolate bowls, providing stability and a finished look. Ensure there is enough space between each disc.
-
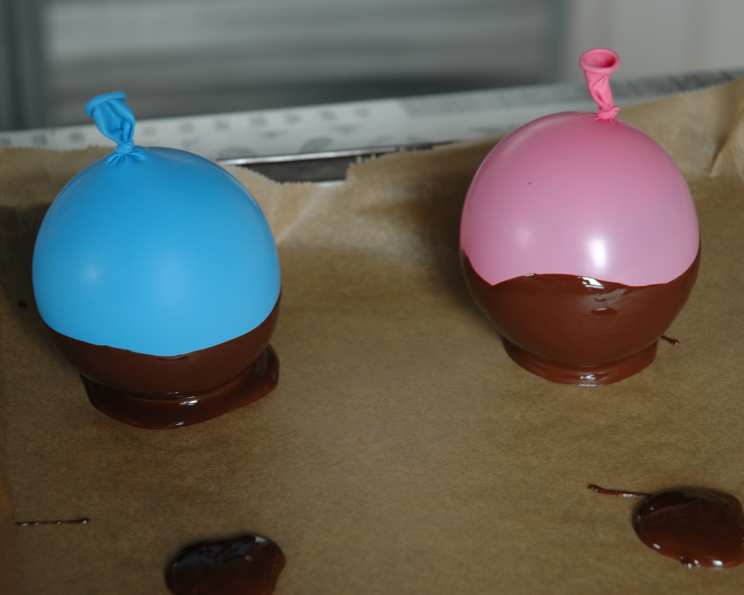
Dip the Balloons: Dip each balloon, one at a time, into the tempered chocolate. Cover as much of the balloon as you want the bowl to be. A slow, even dipping motion will create a smooth, consistent chocolate layer.
-
Position on Discs: Carefully place each chocolate-covered balloon onto one of the chocolate discs on the parchment paper.
-
Cool and Harden: Allow the chocolate to cool and harden completely. This may take several hours, depending on the ambient temperature.
-
Release the Balloons: Once the chocolate has fully hardened, make a tiny hole in the balloon just below the knot. This will slowly release the air. Releasing the air slowly is essential to prevent the chocolate bowl from cracking.
-
Water Release (Optional): If the balloon sticks to the chocolate (which is common), make a tiny slit just below the knot and pour a small amount of tepid water into the balloon. The balloon should detach cleanly from the chocolate.
-
Repair (If Necessary): If any repairs are needed, use more warm, tempered chocolate to patch up any cracks or imperfections.
-
Storage: Set the finished chocolate bowls aside in a cool, dry place until you are ready to use them. They do not need to be refrigerated, unless your kitchen is very warm.
Expert Tips & Tricks
- Tempering is Key: Properly tempered chocolate has a glossy sheen and a satisfying snap. If your chocolate is dull or streaky, it’s likely not tempered correctly. You can re-temper it by repeating the melting and cooling process.
- Balloon Quality: Use high-quality balloons that won’t easily burst.
- Chocolate Choice: Using high-quality dark chocolate with a higher cocoa percentage (60% or higher) will result in a richer, more stable chocolate bowl. Avoid using “dipping chocolate” as it often contains additives that interfere with tempering.
- Double Boiler Alternative: If you don’t have a double boiler, you can create one by placing a heatproof bowl over a saucepan of simmering water, ensuring the bottom of the bowl doesn’t touch the water.
- Practice Makes Perfect: Don’t be discouraged if your first attempt isn’t perfect. Chocolate tempering can be tricky, so practice makes perfect.
Serving & Storage Suggestions
These chocolate bowls are best served soon after being made, as humidity can affect the chocolate’s appearance. Fill them with anything from mousse and ice cream to fruit salad and whipped cream. For a truly decadent experience, try filling them with a rich chocolate ganache or a scoop of gourmet ice cream.
Store leftover chocolate bowls in a cool, dry place in an airtight container. They can last for several days at room temperature, provided they are kept away from heat and humidity. Do not refrigerate, as this can cause the chocolate to bloom (develop a white, powdery coating).
Nutritional Information
| Nutrient | Amount per Serving | % Daily Value |
|---|---|---|
| Calories | 135.9 kcal | N/A |
| Calories from Fat | 76 g | 56% |
| Total Fat | 8.5 g | 13% |
| Saturated Fat | 5 g | 25% |
| Cholesterol | 0 mg | 0% |
| Sodium | 3.1 mg | 0% |
| Total Carbohydrate | 17.9 g | 5% |
| Dietary Fiber | 1.7 g | 6% |
| Sugars | 15.5 g | 61% |
| Protein | 1.2 g | 2% |
Note: Nutritional information is an estimate and may vary based on specific ingredients used.
Variations & Substitutions
- Milk Chocolate Bowls: Use milk chocolate chips instead of dark chocolate for a sweeter, milder flavor.
- White Chocolate Bowls: Use white chocolate chips for a beautiful contrast to dark fillings. Add food coloring to the melted white chocolate for vibrant, colorful bowls.
- Peppermint Bowls: Add a few drops of peppermint extract to the melted chocolate for a refreshing twist. Sprinkle crushed peppermint candies on the chocolate discs before placing the balloons on top.
- Nutty Bowls: Stir chopped nuts (such as almonds, pecans, or walnuts) into the melted chocolate for added texture and flavor.
FAQs (Frequently Asked Questions)
Q: Why is tempering chocolate so important for making chocolate bowls?
A: Tempering creates stable chocolate crystals, resulting in a glossy, smooth, and snappy chocolate that’s less prone to melting or blooming.
Q: Can I use a microwave to melt the chocolate?
A: Yes, but melt the chocolate in short intervals (30 seconds at a time), stirring in between, to prevent burning. Ensure the bowl you use is microwave-safe.
Q: What if my chocolate seizes or becomes grainy?
A: This usually happens when water gets into the chocolate. Try adding a tablespoon of vegetable oil or shortening to help smooth it out. If it’s severely seized, it might be best to start over.
Q: How can I prevent the balloons from sticking to the chocolate?
A: Ensure the chocolate is properly tempered and cooled completely before attempting to remove the balloons. Using the tepid water trick is usually effective.
Q: Can I make these bowls ahead of time?
A: Yes, you can make the chocolate bowls a day or two in advance. Store them in a cool, dry place in an airtight container until ready to use.
Final Thoughts
Creating chocolate bowls is an adventure in edible artistry. It may take a little practice to master the art of tempering, but the results are well worth the effort. Imagine the delight on your guests’ faces when you present them with these exquisite vessels filled with their favorite desserts. So, gather your ingredients, embrace the process, and prepare to create a truly unforgettable culinary experience. Don’t hesitate to experiment with different flavors and fillings to create your own signature chocolate bowl masterpiece. I encourage you to share your creations and experiences – happy chocolate bowl making!