
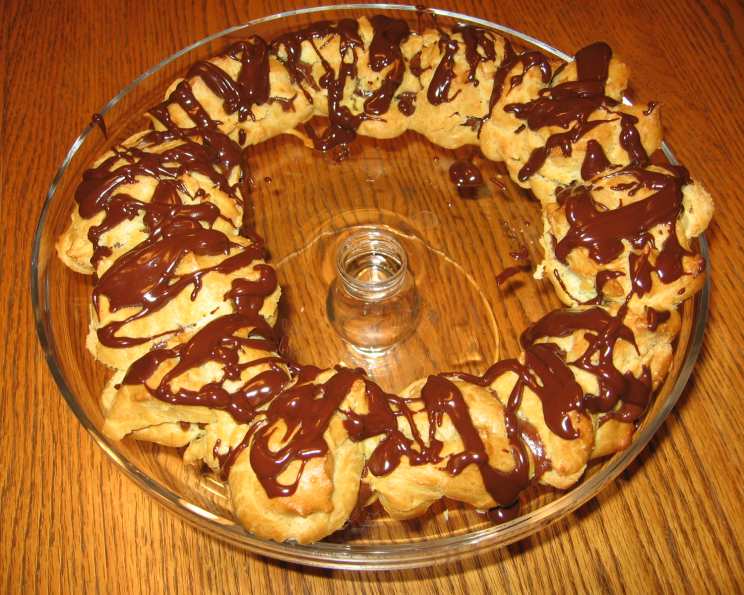
Chocolate Cream Puff Ring: A Chocoholic’s Dream
The first time I tasted this Chocolate Cream Puff Ring, I was at my sister-in-law’s summer barbecue, a picnic table groaning with every imaginable dish. But this dessert, a ring of golden puffs practically bursting with chocolate cream and glistening under a dark chocolate glaze, stole the show. I remember the satisfying crack as my fork broke through the crisp choux pastry, the explosion of rich, decadent chocolate filling on my tongue, and the slightly bitter counterpoint of the glaze. It was pure bliss, a symphony of textures and flavors that I knew I had to recreate. Thankfully, she shared the recipe, and it’s been a treasured staple ever since!
Recipe Overview
- Prep Time: 30 minutes
- Cook Time: 40 minutes
- Total Time: 1 hour 10 minutes
- Servings: 6
- Yield: 1 ring
- Dietary Type: Not Gluten-Free
Ingredients
For the Cream Puff Ring:
- ½ cup water
- 4 tablespoons butter
- ½ teaspoon sugar
- ⅛ teaspoon salt
- ½ cup flour
- 2 large eggs
For the Filling:
- ½ cup butter (no substitutes)
- ½ cup sugar (extra fine if you have it)
- 2 ounces unsweetened chocolate, melted and cooled
- 1 teaspoon real vanilla extract
- 3 large eggs (use fresh eggs and only large)
For the Glaze:
- 2 ounces semisweet chocolate or 2 ounces bittersweet chocolate
- 2 tablespoons butter
Equipment Needed
- Medium saucepan
- Cookie sheet
- Mixer (stand mixer preferred, but hand mixer works too)
- Cooling rack
- Double boiler (or microwave-safe bowl)
- Skewer or narrow knife
Instructions
-
Preheat your oven to 400°F (200°C). Lightly butter a cookie sheet and set it aside. A non-stick cookie sheet is also a great option to prevent sticking.
-
In a medium saucepan over high heat, combine the water, butter, sugar, and salt. Heat the mixture until it comes to a rolling boil.
-
Reduce the heat to low. Add the flour all at once and stir vigorously with a wooden spoon over low heat. Continue stirring until the dough forms a smooth, compact ball that pulls away from the sides of the pan. This should take about 1 minute.
-
Remove the saucepan from the heat and let the dough cool slightly for a minute or two. This prevents the eggs from scrambling when you add them.
-
Beat in the eggs, one at a time, ensuring each egg is fully incorporated before adding the next. The dough will initially look curdled and separated, but keep beating! It will eventually come together into a smooth and satiny dough with a nice sheen. You can use a stand mixer with the paddle attachment for this step, which makes it easier.
-
Transfer the dough to a piping bag fitted with a large round tip (optional, but helpful for consistent shaping) or use two spoons. On the prepared cookie sheet, drop heaping spoonfuls of the dough in a large oval or circle shape, ensuring each dollop touches the one next to it. This is crucial for creating a cohesive ring.
-
Bake the cream puff ring for 35-40 minutes, or until it is golden brown and feels firm to the touch. Avoid opening the oven door during the first 30 minutes of baking, as this can cause the puffs to deflate.
-
Once the ring is golden brown, pierce it in 4 or 5 places with a skewer or narrow knife to allow steam to escape. This helps prevent the ring from becoming soggy and ensures a crispier texture. Return the ring to the oven for a few more minutes after piercing.
-
Remove the ring from the oven and cool it completely on a wire rack. The ring can be prepared a day ahead and wrapped well once cooled.
-
Prepare the filling while the ring is baking or even earlier in the day. In a mixing bowl, cream together the butter and sugar until light and fluffy. This step is best done with a mixer.
-
Beat in the melted and cooled unsweetened chocolate and the vanilla extract.
-
Add the eggs, one at a time, beating well after each addition. Continue to beat the mixture until the sugar is thoroughly dissolved and the filling is smooth.
-
Chill the filling in the refrigerator for at least one hour to allow it to firm up and become more stable.
-
Prepare the glaze. In the top of a double boiler (or in a microwave-safe bowl in 30-second intervals), melt together the semisweet (or bittersweet) chocolate and butter, stirring until smooth and glossy.
-
Assemble the ring. Once the cream puff ring is completely cooled, slice it in half horizontally. Gently remove the top half and set it aside.
-
Fill the bottom half of the ring with the chilled chocolate filling.
-
Replace the top half of the ring and drizzle the prepared chocolate glaze over the top.
-
Chill the assembled Chocolate Cream Puff Ring until ready to serve. This allows the glaze to set and the filling to firm up even more.
-
Serve chilled and enjoy!
Expert Tips & Tricks
- Achieving the Perfect Choux Pastry: The key to a successful cream puff ring lies in the choux pastry. Make sure the water and butter are at a full rolling boil before adding the flour. Stir vigorously and continuously until the dough comes together in a smooth ball. Don’t rush this step!
- Egg Incorporation: When adding the eggs, be patient. The dough will initially separate and look curdled, but keep beating, and it will eventually come together into a smooth, glossy mixture.
- Preventing Soggy Puffs: Piercing the ring after baking is essential to allow steam to escape and keep the puffs crisp.
- Melting Chocolate: When melting the chocolate for the glaze, use a double boiler or microwave in short intervals to prevent burning.
- Even Glaze Distribution: For an even glaze distribution, use a spoon or a small whisk to drizzle the chocolate over the ring. You can also use a piping bag for more precise application.
Serving & Storage Suggestions
Serve the Chocolate Cream Puff Ring chilled for the best flavor and texture. It’s a show-stopping dessert that’s perfect for parties, celebrations, or any special occasion.
Store any leftover Cream Puff Ring in the refrigerator in an airtight container. It will keep for up to 2 days, although the puffs may soften slightly over time. Freezing is not recommended as the filling and pastry texture can change significantly.
Nutritional Information
| Nutrient | Amount per Serving | % Daily Value |
|---|---|---|
| Calories | 498.6 kcal | N/A |
| Calories from Fat | 368 g | 74% |
| Total Fat | 40.9 g | 62% |
| Saturated Fat | 24.5 g | 122% |
| Cholesterol | 226.2 mg | 75% |
| Sodium | 349.7 mg | 14% |
| Total Carbohydrate | 31.1 g | 10% |
| Dietary Fiber | 3.5 g | 13% |
| Sugars | 17.4 g | N/A |
| Protein | 9.1 g | 18% |
Variations & Substitutions
- Different Chocolate: Experiment with different types of chocolate in the filling and glaze. Milk chocolate, white chocolate, or even flavored chocolate (like mint or orange) can add a unique twist.
- Extract Variations: Try different extracts in the filling, such as almond, hazelnut, or coffee.
- Nuts and Decorations: Garnish the finished ring with chopped nuts, sprinkles, chocolate shavings, or fresh berries for added flavor and visual appeal.
- Coffee Infusion: Add a tablespoon of strong brewed coffee to the chocolate filling to enhance the chocolate flavor.
FAQs (Frequently Asked Questions)
Q: Why did my cream puffs deflate?
A: This usually happens when the oven door is opened too early during baking or if the dough wasn’t cooked properly on the stovetop before adding the eggs. Avoid opening the oven door and ensure the dough forms a smooth ball before adding the eggs.
Q: Can I make the cream puff dough ahead of time?
A: It’s best to bake the cream puffs immediately after making the dough. However, you can prepare the dough a few hours in advance and keep it covered in the refrigerator. Bring it to room temperature before piping and baking.
Q: What is the best way to melt chocolate without burning it?
A: Use a double boiler or microwave in short intervals (30 seconds at a time), stirring in between, to prevent the chocolate from overheating and burning.
Q: Can I use a different type of sugar in the filling?
A: Extra-fine sugar is preferred for the filling because it dissolves more easily, resulting in a smoother texture. However, granulated sugar can be used if you beat the filling for a longer period to ensure the sugar is fully dissolved.
Q: How do I store leftover Chocolate Cream Puff Ring?
A: Store any leftover Cream Puff Ring in the refrigerator in an airtight container for up to 2 days.
Final Thoughts
I hope this Chocolate Cream Puff Ring recipe inspires you to create a truly decadent and memorable dessert. Don’t be intimidated by the multiple steps – each one is simple, and the end result is well worth the effort. This ring is a guaranteed crowd-pleaser, perfect for impressing your friends and family. I encourage you to try it, experiment with different variations, and make it your own signature dessert! Feel free to share your feedback and creations! Pair it with a glass of chilled milk or a cup of hot coffee for the ultimate chocolate experience. Happy baking!