
Mother’s Day Slipper Cookies: A Sweet Treat for the Sweetest Woman
I can still remember being a little girl, carefully crafting handmade gifts for my mom on Mother’s Day. One year, armed with construction paper, glitter glue, and an abundance of love, I attempted to recreate her favorite pair of slippers. The result was… well, let’s just say edible wasn’t the first word that came to mind. But the pure joy on her face made me realize it was the thought that truly counted. These Mother’s Day Slipper Cookies bring that same sentiment to life – a fun, edible tribute to the comfort and warmth our mothers provide. This recipe isn’t just about making cookies; it’s about creating a memory.
Recipe Overview
- Prep Time: 30 minutes
- Cook Time: 0 minutes (excluding candy melt time)
- Total Time: 30 minutes
- Servings: 15
- Yield: 30 Slippers
- Dietary Type: Vegetarian
Ingredients
- 15 Nutter Butter sandwich cookies
- 1 cup creamy peanut butter
- 2 tablespoons unsalted butter
- 1 tablespoon heavy cream or 1 tablespoon half-and-half cream
- ⅛ teaspoon salt
- 1 – 1 ¼ cup powdered sugar
- 20 ounces pink candy melts (for Mom) or 20 ounces light chocolate candy melts (for Dad)
- Parchment paper
Equipment Needed
- Rotary-style cheese grater
- Wire mesh cooling rack
- Microwave-safe bowls
- Spatula or knife
- Mini ice cream scoop or teaspoon
- Wooden spoon or finger
Instructions
-
Begin by preparing the Nutter Butter cookies. Carefully separate the cookie halves. Using a knife or spatula, scrape away the peanut butter filling from each cookie. Reserve the filling; you can use it later, perhaps incorporated into the peanut butter fudge or in another delicious creation. This step is crucial for creating a stable base for your slippers and preventing them from becoming too thick.
-
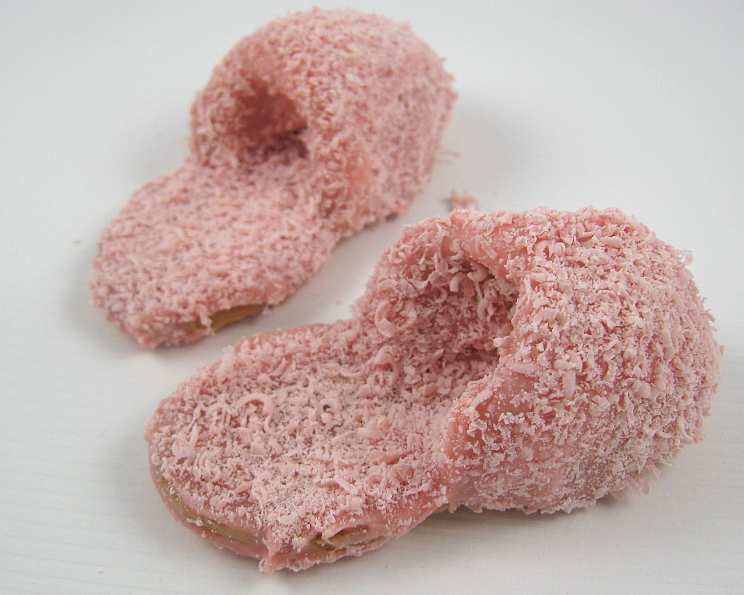
Next, grate 4 ounces of the candy melts using the rotary-style cheese grater. Place the shavings in a bowl. This will be used to decorate the slippers later, adding a touch of elegance. Aim for fine, even shavings for the best visual appeal.
-
Now, it’s time to create the peanut butter “fudge,” which will form the toe of the slipper. In a microwave-proof bowl, combine the peanut butter, butter, cream, and salt. Microwave for 30 seconds, then stir. If the butter isn’t completely melted, microwave for another 20 seconds. Stir well until fully combined.
-
Add the powdered sugar, about ⅓ cup at a time, stirring after each addition. If the mixture becomes too dry, add a tiny amount of cream and stir or knead until you achieve a pliable consistency, similar to play dough. I find that a little less than 1 cup of powdered sugar usually works perfectly, but you can add up to 1 ¼ cups as needed. Be cautious not to overdo the powdered sugar, as it can make the fudge crumbly.
-
Using a mini ice cream scoop or teaspoon, divide the peanut butter fudge into 30 equal balls (approximately 2 teaspoons each).
-
Place each ball on the end of a cookie half. Shape the ball into the front part of the slipper, carefully pinching and sealing the edges to the cookie. This ensures a secure bond and prevents the fudge from separating during the dipping process.
-
Using the end of a wooden spoon or even your finger, gently hollow out an indentation in the top of the fudge to create the space where a foot would slide into the slipper. This detail adds a touch of realism to your sweet footwear.
-
Lay a large sheet of parchment paper on your countertop. Place the wire mesh cooling rack on top of the parchment paper. The parchment paper will catch any excess candy coating that drips off the slippers, making cleanup a breeze.
-
Melt the remaining 16 ounces of candy coating in the microwave or using a double boiler, following the instructions on the package. Be careful not to overheat the candy melts, as this can cause them to seize up. If using a microwave, melt in 30-second intervals, stirring in between, until smooth.
-
Dip each slipper into the melted candy coating, ensuring that all crevices are completely covered, especially the inside of the slipper.
-
Shake off any excess candy coating and place the dipped slipper on the wire mesh rack to set. Repeat this process with the remaining slippers.
-
At this stage, the candy coating should be partially set but not completely hardened. It should be firm enough to hold the shavings, but still slightly tacky. Sprinkle the grated candy melt shavings over the slippers, using a spoon. You may need to pick up each slipper to sprinkle the shavings over the sides. If you run out of shavings, simply gather the shavings that fell onto the parchment paper and reuse them.
-
Freeze the slippers for 5 minutes to set the coating completely. This will help the candy coating firm up quickly and prevent any smudging during handling.
-
Bring the finished slipper cookies to room temperature before serving.
Expert Tips & Tricks
- Don’t overwork the peanut butter fudge. Over-kneading can make it tough.
- If your candy melts are too thick, add a teaspoon of vegetable shortening to thin them out.
- For extra flair, drizzle melted white chocolate or add edible glitter to the finished slippers.
- If the candy coating is too hot, it will melt the shavings. Let it cool slightly before adding the decoration.
- To prevent the peanut butter fudge from sticking to your hands, lightly dampen them with water.
Serving & Storage Suggestions
Serve these adorable Mother’s Day Slipper Cookies on a pretty platter as part of a dessert buffet or package them individually as sweet gifts. They can be stored at room temperature in an airtight container for up to 3 days. For longer storage, keep them in the refrigerator for up to a week. Freezing is not recommended, as the candy coating may become discolored.
Nutritional Information
| Nutrient | Amount per Serving | % Daily Value |
|---|---|---|
| Calories | 216 kcal | 11% |
| Total Fat | 13g | 17% |
| Saturated Fat | 6g | 30% |
| Cholesterol | 0mg | 0% |
| Sodium | 60mg | 3% |
| Total Carbohydrate | 23g | 8% |
| Dietary Fiber | 1g | 4% |
| Sugars | 14g | N/A |
| Protein | 4g | 8% |
Note: Nutritional information is an estimate and may vary based on specific ingredients used.
Variations & Substitutions
- Different Candy Melts: Use dark chocolate, white chocolate, or even colored candy melts to create different looks.
- Nut-Free Version: Substitute the Nutter Butter cookies with another sandwich cookie that doesn’t contain nuts. Use sunflower seed butter instead of peanut butter for the fudge.
- Flavor Extracts: Add a few drops of vanilla, almond, or peppermint extract to the peanut butter fudge for a unique flavor twist.
- Sprinkles: Instead of candy shavings, decorate the slippers with colorful sprinkles, edible pearls, or mini chocolate chips.
- Festive Themes: Customize the colors and decorations to suit different holidays or occasions.
FAQs (Frequently Asked Questions)
Q: Can I make the peanut butter fudge ahead of time?
A: Yes, you can make the peanut butter fudge up to 2 days in advance. Store it in an airtight container at room temperature.
Q: My candy melts are too thick. What can I do?
A: Add a teaspoon of vegetable shortening to the candy melts and microwave in short intervals until smooth.
Q: The candy coating is not setting properly. What am I doing wrong?
A: Ensure the candy coating is not too hot. Also, the humidity in your kitchen might be affecting the setting process. Try refrigerating the slippers for a few minutes to help them set.
Q: Can I use a different type of cookie for the base?
A: Yes, you can use other sandwich cookies, but Nutter Butters work best due to their shape and flavor.
Q: How can I prevent the peanut butter fudge from sticking to my hands?
A: Lightly dampen your hands with water before handling the fudge.
Final Thoughts
These Mother’s Day Slipper Cookies are more than just a dessert; they’re a heartfelt expression of love and appreciation. They may look intimidating, but with a little patience and these detailed instructions, you’ll create something truly special that will delight your mom. So gather your ingredients, put on some cheerful music, and have fun crafting these adorable treats. Don’t hesitate to experiment with different flavors and decorations to make them your own. And most importantly, remember to share your creations with us – we’d love to see your unique slipper designs! Happy baking!